
A pre-trip and post-trip camping checklist system uses two short, reusable lists instead of one long packing list: a pre-trip pull list for loading gear, and a post-trip teardown list for drying, inspecting and restocking gear the day you get home. Both live on one card inside the gear bin, so you never rewrite either list from memory.
Key Takeaways
- The system is two short lists, not one: a pre-trip pull list and a post-trip teardown/restock list, kept together where the gear actually lives.
- Most camping checklists online only cover packing. A university outdoor-recreation program’s own trip-planning guide, for example, lists ten packing categories but gives no post-trip care or storage guidance at all.
- Restocking consumables (fuel, batteries, first-aid supplies) happens during teardown, the day you get home, not the night before your next trip.
- A reusable card beats a list you rewrite each time; you only update it when your actual gear or kit changes.
- The two sides feed each other: what you note as “used up” or “broken” on the post-trip side becomes the first thing you check on the pre-trip side next time.

What Is a Pre-Trip and Post-Trip Checklist System?
Most “camping checklist” content online is really one list: what to pack before you leave. That solves half the problem. The other half shows up the moment you get home, tired, with a car full of gear that’s either damp, disorganized, or missing something you’ll want next time. A pre-trip and post-trip system treats packing and unpacking as one loop, not two separate events, with a list for each half.
The pre-trip side is a pull list: a short checklist you run through while loading the car, confirming each kit is pulled from storage, charged, or restocked from last time. The post-trip side is a teardown and restock list: what you do the same day you unload, before gear goes back into storage. Together they close the loop so nothing sits half-done until the next trip reminds you it’s broken.
Why Build Two Lists Instead of One?
A single packing list only tells you what to bring. It says nothing about what happens to that gear after the trip, which is exactly where storage systems break down. One camper’s own post-trip writeup walks through a four-phase order: packing up at camp, caring for people first, unpacking the vehicle, and only then sorting and restoring equipment, ending with gear stored clean and ready “to grab & go next time.” That last phase, sorting and restoring, is the one most packing-only checklists skip entirely.
Professional organizer Shelina Jokhiya, writing for Decluttr Me, describes a similar four-step post-trip routine: unpack completely and check every pocket, document what you forgot or used up while it’s still fresh in your memory, inspect gear for damage before it goes into storage, and restock consumables immediately rather than waiting. She notes that keeping an updated list means you can say yes to a spontaneous camping invitation without first having to check the state of your equipment.
How Do You Build the Pre-Trip Pull List?
The pull list isn’t a full packing list of every item. It’s a short set of checks that confirm your pre-built kits and storage zones are ready to load, in this order:
- Pull each kit from its storage zone. If you already group gear into kits by trip type, this is a single check per kit, not a hunt through the garage.
- Confirm consumables and batteries. Fuel canisters, headlamp and lantern batteries, matches and first-aid items get checked against whatever you flagged as “used up” after the last trip.
- Add trip-specific items. Weather gear, extra layers, or anything specific to this trip’s length or location gets added on top of the base kit.
- Load in reverse-use order. Whatever you’ll need last at camp goes into the vehicle first, and whatever you’ll need right away goes in last, so you’re not unpacking the whole trunk to find a tarp.
California State University San Marcos’s Outdoor Adventures trip-planning guide organizes its own checklist into ten categories, including shelter and sleep, food and cooking, water and hydration, navigation, and safety and emergency gear. That structure works well for a first trip, but notice what’s missing: the page covers planning and packing in detail and gives no guidance at all for what happens to that gear once you’re back, which is exactly the gap this system is built to close.
How Do You Build the Post-Trip Teardown and Restock List?
The teardown list runs the same day you get home, before gear goes back into its storage zone. Based on the post-trip routines described above, a workable order is:
- Unpack everything, the same day. Check pockets, side pouches, and vehicle door bins, since small items like a knife, a headlamp, or tent stakes are the ones most often left behind.
- Dry anything damp before it’s stored. A tent, rainfly, or damp clothing needs to air out fully before it goes back in a bin; packing it away wet is how storage areas end up with a mildew problem instead of just a packing problem.
- Inspect and flag repairs. Anything damaged gets set aside in its own spot, not restored to the kit as-is, so a broken item doesn’t surprise you mid-trip next time.
- Restock consumables now. Replace fuel, batteries, matches, and first-aid items immediately, while you still remember exactly what ran low.
- Write down gaps while they’re fresh. What you forgot, what you never used, or what you wish you’d packed goes on the list now, not from memory weeks later.
- Return gear to its labeled zone. Everything goes back to where the pull list expects to find it next time, not staged on a shelf “to deal with later.”
Where Should the Checklist Actually Live?
A checklist you have to go find does not get used. The reusable version of this system puts both lists on one card, split front-to-back or side-by-side, and tapes or clips it inside the lid of the gear bin itself, not in a drawer or a phone note you forget to open. Laminating the card, or slipping it into a clear plastic sleeve, means you can check items off with a dry-erase marker and wipe it clean for the next trip instead of printing a new copy every time.
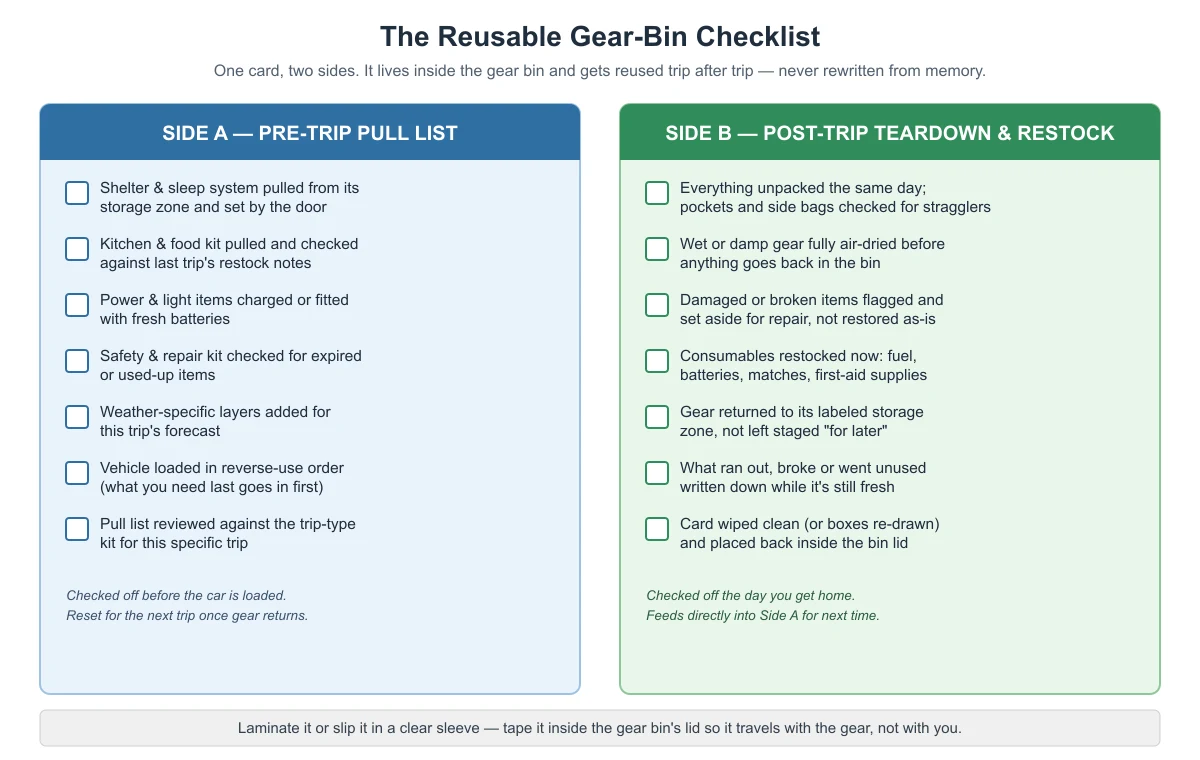
The table below lays out the same two-sided template in text form, so it’s easy to copy into your own checklist app, printed card, or laminated sheet.
| Side | Step | What you check or do | When |
|---|---|---|---|
| A — Pre-trip pull list | 1 | Shelter & sleep system pulled from its storage zone | Before loading the vehicle |
| A — Pre-trip pull list | 2 | Kitchen & food kit pulled, checked against last trip’s restock notes | Before loading the vehicle |
| A — Pre-trip pull list | 3 | Power & light items charged or fitted with fresh batteries | Before loading the vehicle |
| A — Pre-trip pull list | 4 | Safety & repair kit checked for expired or used-up items | Before loading the vehicle |
| A — Pre-trip pull list | 5 | Weather-specific layers added for this trip’s forecast | Day before departure |
| A — Pre-trip pull list | 6 | Vehicle loaded in reverse-use order | Loading day |
| A — Pre-trip pull list | 7 | Pull list reviewed against the trip-type kit for this trip | Loading day |
| B — Post-trip teardown | 1 | Everything unpacked same day; pockets and side bags checked | Day you get home |
| B — Post-trip teardown | 2 | Wet or damp gear fully air-dried before it goes back in the bin | Day you get home |
| B — Post-trip teardown | 3 | Damaged items flagged and set aside for repair | Day you get home |
| B — Post-trip teardown | 4 | Consumables restocked now (fuel, batteries, matches, first aid) | Day you get home |
| B — Post-trip teardown | 5 | Gear returned to its labeled storage zone | Day you get home |
| B — Post-trip teardown | 6 | What ran out, broke, or went unused written down while fresh | Day you get home |
| B — Post-trip teardown | 7 | Card wiped clean and placed back inside the bin lid | Day you get home |
How Do You Keep the System From Turning Into a “What to Pack” List?
The two-sided card only works if it stays short. The moment it tries to also list every item you might need, it turns back into the generic packing listicle this system is meant to replace. Keep item-level detail on your trip-type kits instead (see the link below), and keep the checklist card itself limited to the handful of actions above: pull, check, load; then unpack, dry, inspect, restock, return. If you need to add a line, ask whether it’s an action (belongs on the card) or an item (belongs in a kit list).

How Does This Fit Into Your Full Gear Storage System?
This checklist is the workflow layer that sits on top of wherever you actually store gear. If you haven’t settled on a storage location yet, start with our pillar guide, How to Organize Camping Gear Storage at Home, which covers the full decision system for garages, closets, sheds and apartments. If your gear is already organized into trip-specific kits, this checklist is what keeps each kit ready between trips; see How to Organize Camping Gear by Trip Type (Grab-and-Go Kits) for how to build those kits in the first place. And if your post-trip teardown keeps turning up gear you never actually use, work through How to Declutter Camping Gear You Don’t Use Anymore before you restock it back into the bin.
Frequently Asked Questions
How long should a pre-trip or post-trip checklist be?
Short enough to run in a few minutes. Aim for 6-8 lines per side. If your list is growing past that, you’re probably listing individual gear items instead of actions; move item-level detail into a trip-type kit list and keep the checklist card to pull, check, load on one side and unpack, dry, inspect, restock, return on the other.
Should the checklist be digital or on paper?
Either works, as long as it’s reusable and lives with the gear. A laminated card or dry-erase sheet taped inside the bin lid works without a phone or app. A notes app or checklist app works too, as long as you actually open it while standing at the bin, not just plan to.
When exactly should I restock consumables after a trip?
The same day you get home, while you still remember what ran low, according to professional organizer Shelina Jokhiya’s post-camping routine. Waiting until the night before your next trip means relying on memory for things like fuel level or first-aid supplies that are easy to misjudge weeks later.
Do I need a different checklist for every trip type?
No. Keep one reusable pre-trip/post-trip card for the workflow, and pair it with separate trip-type kits (car camping, backpacking, day trip) for the item-level detail. The card stays the same; only the kit you pull from it changes.
What’s the single biggest reason these systems fail?
The checklist gets stored somewhere other than with the gear, so it stops getting used after a trip or two. Keeping it taped inside the bin lid, not in a drawer or a phone note you forget about, is what makes it reusable instead of a one-time printout.
Sources
- California State University San Marcos Outdoor Adventures — How to Plan Your Own Camping Trip
- Decluttr Me — Get Your Camping Gear Ready for the Next Trip
- Camping for Women — Using a Post-Camping Checklist or Process
By campstorageguide.com Editorial Team. Last updated: November 12, 2026.
One thought on “Build a Pre-Trip and Post-Trip Camping Checklist System”